The handling of canceled appointments in SUMO is governed by two settings: “Keep Canceled Salesforce Events” and “Keep Canceled SUMO Events”. These can be configured in the SUMO Admin settings under General Settings.
When an Appointment is Canceled:
Availability: The time slot previously occupied by the canceled appointment will be freed up, allowing new appointments to be scheduled in its place.
Event Deletion: The event will be removed from both Salesforce and the Source Calendar. However, if “Keep Canceled Salesforce Events” is enabled, the event will remain in Salesforce.
Email Notification: An email notification about the cancellation will be sent to the host.
Calendar Invites: Calendar invites related to the canceled appointment will be removed from both the host’s and participants’ calendars.
When an Appointment is Rescheduled/Updated:
Availability: The original time slot will be freed up, and the new time slot will be blocked, allowing new appointments to be scheduled in place of the original time.
Event Update: The event details will be updated in both Salesforce and the Source Calendar.
Email Notification: Email notifications about the reschedule or update will be sent to both the host and participants. If the appointment is rescheduled internally, you have the option to skip sending the update notification to the participants.
Calendar Updates: Calendar entries for both the host and participants will be updated with the new appointment details.
The self-scheduling guests will be presented with a simple form to identify themselves, necessary to add them as attendees to the appointment or event they are self-scheduling. You can choose to match on leads, contacts, or person accounts.
Leads
You can choose to:
Create a New Lead every time – SUMO would not look for a match in this case and would just create new every time.
Match Lead by Salesforce Duplicate Rules – this would look to your Salesforce duplicate rules to find a match for the Lead if one is not found a new one would be created.
Match Lead by Advanced Match – (Coming June 2024) – This option would require you create an apex class called SUMOApexMatcher and then you could have this look across both leads and contacts to find a match based on email address if one is not found a new lead would be created. You could also use this option to match on leads and contacts in more advanced ways it would require you edit you SumoApexMatcher Apex Class. (Example code given below) This can also be achieved creating a flow: Example below as well.
Match Lead on the Following field – here you can pick a field that SUMO would look to for finding a match. (example Mobile Phone). If a lead is not found with a match then a new one would be created.
Contacts
Match Contact by Salesforce Duplicate Rules – this would look to your Salesforce duplicate rules to find a match for the Contact if one is not found a new one would be created.
Match Contact by Advanced Match – (Coming June 2024) – This option would require you create an apex class called SUMOApexMatcher and then you could have this look across both leads and contacts to find a match based on email address if one is not found a new lead would be created. You could also use this option to match on leads and contacts in more advanced ways it would require you edit you SumoApexMatcher Apex Class. (Example code given below) This can also be achieved creating a flow: Example below as well.
Match Contact on the Following field – here you can pick a field that SUMO would look to for finding a match. (example Mobile Phone). If a Contact is not found with a match then a new one would be created.
Person Accounts
Match Person Account by Salesforce Duplicate Rules – this would look to your Salesforce duplicate rules to find a match for the Person Account if one is not found a new one would be created.
Match Person Account by Advanced Match – (Coming June 2024) – This option would require you create an apex class called SUMOApexMatcher and then you could have this look across both leads and contacts to find a match based on email address if one is not found a new lead would be created. You could also use this option to match on leads and contacts in more advanced ways it would require you edit you SumoApexMatcher Apex Class. (Example code given below) This can also be achieved creating a flow: Example below as well.
Match Person Account on the Following field – here you can pick a field that SUMO would look to for finding a match. (example Mobile Phone). If a Person Account is not found with a match then a new one would be created.
Additional Options
Match Only on SUMO created Records – if you enable this feature SUMO would only look at leads, contacts, or person accounts when matching that were created by SUMO.
Override existing data – If you enable this feature SUMO will override the data on the lead, contact, or person account record. example: if the customer enters a new phone number than what is in Salesforce SUMO would update the mobile phone field. SUMO will never update the First Name, Last Name, or the Account name. You also have the option to protect certain contact fields on the contact tab.
Example Flow:
If Autolaunched Flow is selected, make sure to have Autolaunched Flow with api name SumoFlowMatcher which must have the following input/output parameters: Input:
client (Data Type: Record, Object: Lead / Contact / Account) – this is a record populated by a form on portal page
processId (Data Type: Text) – this is an Id of sumoapp__Process__c record (Scheduler Template) that can be used to obtain template settings if needed
Output:
matchResult (Data Type: Text) – assign an Id of Lead / Contact / Account to output parameter
Implement flow logic per your use case.
Make sure to assign the result to matchResult output parameter which will then be pulled by Sumo package code.
If Apex Class is selected, make sure to have an apex class called SumoApexMatcher and implementing the following callable interface:
action = findRecords, args = processId (sumoapp__Process__c record Id), client (SObject representing Lead / Contact / Account)
Test Class:
@IsTest
public class SumoApexMatcherTests {
    @TestSetup
    static void makeData() {
        insert new sumoapp__Process__c(
            sumoapp__Name__c = 'SumoApexMatcherTests',
            sumoapp__ProcessType__c = 'LEADS',
            sumoapp__LeadTypeOptions__c = 'MATCH_LEAD_ADVANCED'
        );

        insert new Lead(
            LastName = 'SumoLead',
            Company = 'Sumo',
            Email = 'lead@sumo.com'
        );

        insert new List<Contact>{
            new Contact(
                LastName = 'SumoContact',
                Email = 'contact@sumo.com'
            ),
            new Contact(
                LastName = 'SumoContact with email same as existing Lead',
                Email = 'lead@sumo.com'
            )
        };
    }

    @IsTest
    static void existingLeadShouldBeMatchedByEmail() {
        sumoapp__Process__c process = [SELECT Id FROM sumoapp__Process__c WHERE sumoapp__Name__c = 'SumoApexMatcherTests' LIMIT 1];
        Lead leadRecord = [SELECT Id, Email FROM Lead WHERE LastName = 'SumoLead' LIMIT 1];

        Map<String, Object> params = new Map<String, Object>{
            SumoApexMatcher.CLIENT_PARAM => new Lead(LastName = 'New Lead', Company = 'NotSumo', Email = leadRecord.Email),
            SumoApexMatcher.PROCESS_ID_PARAM => process.Id
        };

        Test.startTest();
        List<Id> matchResult = (List<Id>)new SumoApexMatcher().call(SumoApexMatcher.FIND_RECORDS_METHOD, params);
        Test.stopTest();

        Assert.areEqual(
            leadRecord.Id,
            matchResult.get(0),
            'If new lead has same Email as existing Lead and Contact, a matching Lead Id should be returned'
        );
    }

    @IsTest
    static void existingContactShouldBeMatchedByEmail() {
        sumoapp__Process__c process = [SELECT Id FROM sumoapp__Process__c WHERE sumoapp__Name__c = 'SumoApexMatcherTests' LIMIT 1];
        Contact contactRecord = [SELECT Id, Email FROM Contact WHERE LastName = 'SumoContact' LIMIT 1];

        Map<String, Object> params = new Map<String, Object>{
            SumoApexMatcher.CLIENT_PARAM => new Lead(LastName = 'New Lead', Company = 'NotSumo', Email = contactRecord.Email),
            SumoApexMatcher.PROCESS_ID_PARAM => process.Id
        };

        Test.startTest();
        List<Id> matchResult = (List<Id>)new SumoApexMatcher().call(SumoApexMatcher.FIND_RECORDS_METHOD, params);
        Test.stopTest();

        Assert.areEqual(
            contactRecord.Id,
            matchResult.get(0),
            'If new lead has same Email as existing contact, a matching contact id should be returned'
        );
    }

    @IsTest
    static void matchingShouldOnlyWorkForLeadForm() {
        sumoapp__Process__c process = [SELECT Id FROM sumoapp__Process__c WHERE sumoapp__Name__c = 'SumoApexMatcherTests' LIMIT 1];
        Contact contactRecord = [SELECT Id, Email FROM Contact WHERE LastName = 'SumoContact' LIMIT 1];

        Map<String, Object> params = new Map<String, Object>{
            SumoApexMatcher.CLIENT_PARAM => new Contact(LastName = 'New Contact', Email = contactRecord.Email),
            SumoApexMatcher.PROCESS_ID_PARAM => process.Id
        };

        Test.startTest();
        List<Id> matchResult = (List<Id>)new SumoApexMatcher().call(SumoApexMatcher.FIND_RECORDS_METHOD, params);
        Test.stopTest();

        Assert.isTrue(
            matchResult.isEmpty(),
            'Matching is only implemented for Lead as source record'
        );
    }

    @IsTest
    static void callingUnsupportedMethodShouldThrow() {
        try {
            new SumoApexMatcher().call('unsupportedMethod', new Map<String, Object>());
        } catch (Exception ex) {
            Assert.isInstanceOfType(ex, SumoApexMatcher.SumoApexMatcherException.class, 'SumoApexMatcherException with a message should be thrown');
        }
    }
}
Class:
/**
 * Custom Lead matching implementation
 */
global inherited sharing class SumoApexMatcher implements Callable {
    @TestVisible
    private static final String PROCESS_ID_PARAM = 'processId';
    @TestVisible
    private static final String CLIENT_PARAM = 'client';
    @TestVisible
    private static final String FIND_RECORDS_METHOD = 'findRecords';

    public Object call(String action, Map<String, Object> args) {
      switch on action {
        when 'findRecords' {
          return this.findRecords((SObject)args.get(CLIENT_PARAM), (Id) args.get(PROCESS_ID_PARAM));
        }
        when else {
            throw new SumoApexMatcherException('This action ' + action + 'is not supported!');
        }
      }
    }

    /**
     * Finds Lead by Email, if not found tries to find Contact by Email. If nothing found, returns empty collection
     *
     * @param sourceRecord client record (Lead / Contact / Account) populaded via portal form
     * @param processId    scheduling template Id. If needed, related matching options (fields on sumoapp__Process__c object) can be selected using SOQL
     * @return             `List<Id>` list consisting of matched record Id (one, if more returned - first will be taken). Empty list or null if no match found
     */
    private List<Id> findRecords(SObject sourceRecord, Id processId) {
        List<Id> matchedRecordIds = new List<Id>();

        System.debug('custom matching');

        // only execute matching logic if source record is Lead (change or remove this if needed, or make dependent on sumoapp__Process__c settings)
        if (sourceRecord.getSObjectType() != Lead.getSObjectType()) {
            return matchedRecordIds;
        }

        Lead leadRecord = (Lead) sourceRecord;

        for (Lead match : [SELECT Id, IsConverted, ConvertedContactId FROM Lead WHERE Email = :leadRecord.Email WITH SYSTEM_MODE LIMIT 1]) {
            Id matchId = match.IsConverted == true ? match.ConvertedContactId : match.Id;
            matchedRecordIds.add(matchId);
        }
        if (matchedRecordIds.isEmpty()) {
            for (Contact match : [SELECT Id FROM Contact WHERE Email = :leadRecord.Email WITH SYSTEM_MODE LIMIT 1]) {
                matchedRecordIds.add(match.Id);
            }
        }

        return matchedRecordIds;
    }

    public class SumoApexMatcherException extends Exception {}
}
The Online Scheduler is now Flow based this means that you can change the order the pages display by simply changing the Flow.
To change the flow navigate to:
Setup
Flows
Find the Online Scheduler Flow
click to enlarge
Once you have made the changes that you want you would need to select the last screen and set the last screen to true and the old last screen will need to be set to false.
click to enlarge
To change your Online Scheduler Process to now use the new flow navigate to:
SUMO releases stand as pivotal milestones in our product’s evolution, introducing innovative features, refining the user interface, and addressing customer feedback. Our release process involves QA testing and a security review to provide a robust package.
It is worth noting that once a release is out, we do not revisit older versions for the same level of scrutiny. This underscores the importance of staying up-to-date with the latest SUMO version. By doing so, you ensure access to a thoroughly tested and optimized package, tailored to accommodate changes in platforms like Salesforce or AWS.
For a comprehensive overview of each release, we document all changes in our knowledge base at cep.sumoscheduler.com. The knowledge base serves as a valuable resource, detailing the enhancements and modifications made in each release.
While we are committed to assisting with any challenges you encounter using our product, it is crucial to emphasize that our support extends to versions within the past two major releases. This policy ensures that we can provide the most effective and timely assistance while maintaining the integrity of our evolving product. (Major Releases are whole numbers example 11,12, 13, etc)
FAQ
What if I find a bug in an old release?
We highly recommend keeping your SUMO installation up to date with the two latest released versions to ensure you benefit from the latest features, improvements, and security updates. If you happen to encounter a bug in an older release, our team may have already addressed and resolved it in a subsequent version. Upgrading to the latest release will not only provide you with the best user experience but also minimize the likelihood of encountering known issues. If you have any questions or need assistance with the upgrade process, feel free to reach out to our support team—they’re here to help!
What if I want the bug fixed in the old release and I do not want to upgrade?
If you are experiencing a specific issue in the older release and prefer not to upgrade, we regret to inform you that we are unable to provide support or bug fixes for unsupported versions. Our development and support efforts are focused on maintaining the stability and functionality of the latest releases.
To address the issue you’ve encountered, we encourage you to upgrade to the latest version. This not only ensures a smoother experience but also allows us to provide you with the necessary support to resolve any potential issues.
Why are old releases not supported?
SUMO is dependent on dynamic third-party technologies such as Salesforce and various web browsers, each of which undergoes continuous evolution. As a result, ensuring the perpetual integrity and security of older releases becomes challenging. While every effort is made to conduct comprehensive security scans during the release phase, the ever-changing landscape of technology introduces the possibility of unforeseen events.
Despite passing rigorous security assessments at the time of release, the inherent nature of technological advancements and potential exploits, such as those affecting browsers, may introduce vulnerabilities over time. We acknowledge the dynamic nature of the technological environment and advise users to always upgrade to the latest version for the most robust and secure experience.
Your understanding and cooperation in prioritizing the latest releases contribute significantly to maintaining the highest standards of performance and security within the SUMO framework.
Find and open the Send Email flow (Could also be called Send Email – Update Address or SUMO Send Email)
Add a scheduled path setting it to the amount you would like the additional reminder to send.
Example: If your email reminder is set to send 1 day before the appointment and you would like another to send 1 hour before the appointment you would set this to 23 Hours After.
Click to enlargeClick to enlarge
Add a Decision of Type equals Reminder
Click to enlarge
Resource = {!$Record.sumoapp__Type__c}
Value =
Draw a line between the START and Decision with the scheduled path that you selected.
Click to enlarge
Draw a line between the decision and the Action.
Click to enlarge
If you would like to add additional reminders you can do this by completing the steps starting with the 4th bullet.
Yes, you can change the subject of the appointment with a flow. If you would like the customers name, phone number or event the status of the appointment to appear in the subject you can achieve this with a flow.
Changing the subject will allow you to see some additional details from the source calendar without clicking on the event. So you can quickly see the Status, the Customers Name, etc.
To create the flow:
Setup
Flows
New Flow
Record Triggered Flow
Create
Object = Event
Configure Trigger – A record is created or updated
You can add just email address to an appointment to add someone who is not a record in Salesforce. To enable this feature you would Navigate to SUMO Admin Settings – General Settings – Enable Participant Scheduling.
Click to enlarge
This setting will allow you to add a Participant to an appointment using just their email address. You will still need to have the SUMO User (Host) and a Primary Participant (Contact, Lead, or Person Account).
Click to enlarge
Q: What SUMO Modules is this available in?
A: You can add a Non Salesforce email address to the New Appointment and the Email an Invite Modules.
Q: Why would I need to do this?
A: If you would like to add a spouse, child or a friend of the primary participant to the appointment you can now easily do this without having to create a new Lead, Contact, or Person Account.
Q: Can I add just an host and just a non Salesforce record?
A: At this time you have to add a Contact, Lead, or Person account to every appointment. Adding a non Salesforce record will give you the ability to add additional participants to an appointment.
Q: Does everyone receive the emails about the appointment?
A: Yes, everyone included in the appointment will receive the emails.
You can add the New Appointment and Email an Invite buttons to any standard or custom object.
Navigate to Setup
Object Manager
Find the object you want to add the buttons to
Page layouts
Select the layout you would like to add the buttons to
Select Mobile and Lightning Actions
Drag the Button to the page layout
Q: Why do I see 3 buttons for New Appointment and Email an Invite?
A: There are 3 buttons if you hover over them you will see additional details.
There are two with Action Type Quick action – The one with Community in the name is the button you would add to a community page layout. The other Quick action is the one you will add to the page layout if you are using lightning.
The one with Action Type Custom Button is the one that you will use if you are using Salesforce Classic. If adding the button to classic you can click on buttons instead of Mobile and Lightning actions.
Q: I have added the buttons but I do not see it on cases?
A: The SUMO buttons usually appear in the quick actions section of the record.
Click to enlarge
On cases the SUMO buttons will appear in the activity section.
Click to enlarge
Q: What objects can I add the buttons to?
A: Out of box you can add the buttons to Contacts, Leads, Accounts, Case and Opportunity.
Q: How do I add the buttons to a custom Object?
A: Please use this document for adding the New Appointment and Email an Invite Buttons to a custom object.
In order to make these changes, you will need to enable Translation Settings. This will allow you to override SUMO values through custom labels See Salesforce documentation here.
Label Name
Original Value
EMAIL_PHONE_INBOUND_SECTION_TITLE
Phone – You will call us
Once you have enabled translations, please follow the instructions below.
Custom Labels
Navigate to Setup – Custom Labels
Find the custom label with the name ‘EMAIL_PHONE_INBOUND_SECTION_TITLE’ and click on it
Click on ‘New Local Translations/Overrides’ button
Select English for language as this means you are overriding the current English value.
Enter ‘Your preferred value’ in the Translation Text and click save.
Complete the same for the following label: ONLINESCHEDULER_BOOKED_PHONE_TYPE
SUMO Service\Skill
Navigate to SUMO Service\Skill object
Click On fields and relationships
Find and click on the field ‘Online Scheduler Location Options.’
Scroll to the Value section and click edit next to ‘Phone – You will call us.’
Update the Label to ‘Your preferred value’
SUMO Location
Navigate to SUMO Location object
Click On fields and relationships
Find and click on the field ‘Location Scheduling Option.’
Scroll to the Value section and click edit next to ‘You will call us.’
Update the Label to ‘Your preferred value’
SUMO Scheduling Process
Navigate to SUMO Scheduling Process object
Click On fields and relationships
Find and click on the field ‘Location Options.’
Scroll to the Value section and click edit next to ‘You will call us.’
Update the Label to ‘ Your preferred value ’
You can also change other custom labels in the same way.
Example: Company Participants
Navigate to Setup – Custom Labels
Find the custom label with the name ‘COMPANY_TITLE‘ and click on it (This will change Company)
Click on ‘New Local Translations/Overrides’ button
Select English for language as this means you are overriding the current English value.
Enter ‘Your preferred value’ in the Translation Text and click save.
Find the custom label with the name ‘PARTICIPANTS‘ and click on it (This will change Participants)
Click on ‘New Local Translations/Overrides’ button
Select English for language as this means you are overriding the current English value.
Enter ‘Your preferred value’ in the Translation Text and click save.
You can do this with all of the SUMO Labels if you have any questions please reach out to our support team.
Note: Salesforce System Administrator permissions required.
Navigate to Setup in Salesforce
Click “Quick Find” box and type “Users”
Click the “Users” option.
Click the “New User” button.
Select “User License” as “Chatter Free”
Select Profile as “Chatter Free User”
Enter the Email ID of the user in the “Email” and “Username” fields.
Fill other mandatory fields.
Assign a SUMO License
Any user who needs access to SUMO as the host of a meeting, scheduling on behalf of, or admins all require a SUMO license. Please see instructions below on how to assign a SUMO license.
Multiple Users
Navigate to Setup | Installed Package
Click Manage Licenses next to the SUMO CEP package
Any SUMO User that will be hosting a SUMO Appointment will also require a service offered record for each SUMO Service that they are authorized to host. Instructions on how to create a service offered record can be found at the link below.
Click on the + to see all tabs
Search for SUMOServices / Skills and click on it
Click on the Service / Skill you are trying to add someone to.
Click Related
Look for the Service/Skill Offered option.
Click New and Add the user
Click Save
Click to enlarge
Connect Ghost User Calendar
Each SUMO User that will host appointments or events will need to connect their calendars, define their ability and update their web conference details. However, because Ghost Users are Chatter Free users in Salesforce, they cannot actually login to a Salesforce environment. Which means a SUMO Admin or Manager will need to complete these tasks for them. Please see the instructions below.
Navigate to SUMO User Settings
Click on the X in the
Click to enlarge
Start typing in the Ghost users’ name and select them from the list
You are now acting as this user, and can complete the tasks outlined below.
Note: If they are connecting an Outlook or Google calendar for these users, you may need to have a virtual share screen session with the user so they can log into their Google or Outlook account.
Once a Ghost Users calendar has been connected and service offered records have been created, your SUMO Admin’s next step is to add these users to the scheduling processes. Please see the instructions below.
Navigate to SUMO Admin Settings
Click on the scheduling type that you want to add the users to.
Click Edit next to the Scheduling Process that you want to add the users to.
Click to enlarge
Navigate to the Who tab.
Highlight the user in the available box.
Click to enlarge
Click the arrow to add the Users to the selected box.
SUMO will present all availability to your customers so they can select the best time. With this, more than one user could be available at any time. You can apply different logic to decide who is assigned to host the appointment.
The first thing SUMO will do is look at the group of SUMO users in the process. It will look to see who is available at the location selected or predefined in the process; then, it will look to see who offers the service that was selected. It will look to see what users are available at the time the customer selects. Once SUMO has looked at that group of users and eliminated the ones that don’t meet the criteria, it will then apply the assignment logic you select.
Round-Robin – This logic will assign appointments based on the last to receive an appointment from this specific process. No other Scheduling processes will be taken into account.
If you have five users: Donald, Julie, Morgan, Victor, and Marcia, it will assign Donald an appointment, then Julie, then Morgan, and so on. If all criteria were the same. Location, Service, and Time. They will get an equal number of appointments assigned to them.
Load-Balance – This logic looks at all SUMO processes and will assign based on who has the most availability and assign appointments based on that.
If you have five users: Donald, Julie, Morgan, Victor, and Marcia, all available at 10 AM on any day, and a customer wants that slot, we will then look to see who has the most availability in the time period that you specify and assign it to them.
Random – This has no actual logic; it will randomly assign someone from the process to be the host.
Priority Based – This will allow you to prioritize who will get the appointments. You can set users at the same priority level, and it will then use one of the previously described logics to determine who gets the appointment if all users are available at that time.
User Choose – This will present all user’s names to the customer, which will allow them to select a specific person. There is also an option to see all availability, and it will randomly assign if the customer selects this when there is more than one person available at that time.
Q: Why would I want to add a custom lookup field to the page?
A: By adding this to the new appointment page it will allow you to easily map that field to the related to field of the Standard event. This now means you can schedule directly from the SUMO Multi Calendar and be able to add the related information.
To Set this up you will need to create a custom lookup field to the standard Salesforce event object or the SUMO Additional info object. If you already have a lookup field created you can use that one.
Once you have the field created you will Navigate to:
SUMO Admin Settings
Invite Manager
Click Edit on an Existing Template or Create one
Custom Fields
On the Invite Manager tab select Event or SUMO Additional Info
Select lookup field
Optionally you can change the label and control the fields that appear in the search layout.
Click to enlarge
Now when you go to create an appointment on the SUMO Multi Calendar you will be able to add a related object.
Click to enlarge
Note: This does not populate the related to field on the event, if you would like that field populated you will need to create a flow to populate the field for you.
SUMO has the ability to allow your customers to self-schedule an offsite appointment, which will dispatch a SUMO User that is close to them in proximity to their desired meeting place.
SUMO has two options to choose from when allowing off site location scheduling. See the differences below.
Zone Based
The SUMO Admin will configure Zones with mile radius parameters, and SUMO will auto-assign users based on their proximity to these zones. Look for the “Your Location Assignment Strategy” section here to learn more.
The customer will use the SUMO Online Scheduler to quickly complete a series of configurable steps that may include:
WHAT: Choose an Appointment Type (Service)
WHERE: Enter an Address (this could be the customer’s home or a 3rd party address like a local Cafe or Restaurant).
WHEN: Choose an available Date/Time
Logic Scenarios can be reviewed below.
Click to enlarge
Customer 1
The customer enters their home address.
SUMO begins searching in Zone1 trying to find a SUMO User. When no user is found, SUMO starts searching in the next zone, and so on, until we find a SUMO User.
User is found, we offer the availability for that User.
The customer picks a date/time and the appointment is booked.
Customer 2
The customer enters their home address.
SUMO begins searching in Zone1 trying to find a SUMO User. When no user is found, SUMO starts searching in the next zone, and so on, until we find a SUMO User.
SUMO finds multiple Users available in Zone3, we offer the availability for all of them.
The customer picks a date/time where two of the SUMO Users happen to be available.
SUMO refers to the assignment logic that was selected in the scheduling process (Round Robin, Load Balance, etc.), and books the appointment with the appropriate SUMO User.
Customer 3
The customer enters their home address.
SUMO searches through all the zones, and doesn’t find any SUMO Users
SUMO displays a message to the customer, that you do not offer service to this address.
Area Based
The SUMO Admin will configure the SUMO Location records with mile radius parameters, and SUMO will auto-assign users based on their availability being configured to that SUMO Location. The admin will also need to turn this on if they would like to use this logic instead of Zone Based.
The customer will use the SUMO Online Scheduler to quickly complete a series of configurable steps that may include:
WHAT: Choose an Appointment Type (Service)
WHERE: Enter an Address (this could be the customer’s home or a 3rd party address like a local Cafe or Restaurant).
WHEN: Choose an available Date/Time
Logic Scenarios can be reviewed below.
Click to enlarge
Scenario 1
The customer enters an address.
The address falls within the 10 miles radius configured for Location A
SUMO will provide the available slots for any user that has availability defined for that SUMO Location record.
Customer picks date/time and the appointment is booked with a User available at that time. If multiple users are available at that date/time, SUMO refers to the assignment logic that was selected in the scheduling process (Round Robin, Load Balance, etc.), and books the appointment with the appropriate SUMO User.
Scenario 2
The customer enters an address
This address falls within the 8 mile radius configured for Location D and within the 5 mile radius configured for Location B.
SUMO will offer all available slots for any user that has availability defined for both SUMO Location records.
Customer picks date/time and the appointment is booked with a User available at that time. If multiple users are available at that date/time, SUMO refers to the assignment logic that was selected in the scheduling process (Round Robin, Load Balance, etc.), and books the appointment with the appropriate SUMO User.
Scenario 3
The customer enters an address.
This address doesn’t fall within the mile radius assigned to any location that is assigned to the scheduling process.
SUMO displays a message to the customer, that you do not offer service to this address.
Note: When using in person scheduling you will want to obtain a Google API key. You can do this by clicking here.
Navigate to API’s & Services > Library > Select Maps on the left hand side
Confirm that the following libraries are enabled in the Google API settings.
– Places API
– Geocoding API
– Maps Javascript API
– Maps Static API
SUMO offers functionality to send your participants appointment reminders through SMS notifications. To find out more about purchasing SMS credits please contact your Account Executive. If you have already purchased SMS credits, please review the information below.
Prerequisites
Log-a-Case with the SUMO support team to obtain your SMS phone number.
Configure the SMS reminder message.
Add Mobile Phone as a required field to your scheduling processes.
Decide which scheduling process you would like to send an SMS reminder.
SMS reminders will only be sent to participants that were scheduled for an appointment through a scheduling process where SMS reminders are configured and turned on.
Configure SMS Reminders
Navigate to SUMO Admin Settings
Click edit next to the scheduling process(s) that you want to configure SMS reminders to be sent for the appointments scheduled through that scheduling process.
Be sure to configure across both the online and invite manager scheduling processes.
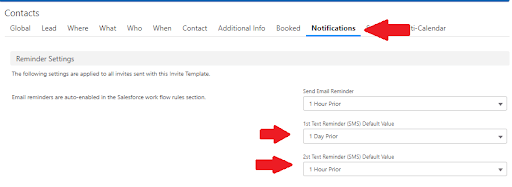
Click to enlarge
Navigate to the Notifications Tab and set the text reminders default values
You are not required to send 2 notifications. Keep in mind that if you define the default value for both then you are using 2 SMS credits for every appointment scheduled through this process.
Click to enlarge
Scroll down to the bottom of the notification tab to the section Text Message Template. Construction a SMS message using a combination of text and merge fields.
Example Message:
{!Contact.FirstName} your {!Event.Subject} appt. with {!Event.OrganizerFullName__c} is on {!Event.DayWeek__c} {!Event.Month__c} {!Event.DayMonth__c} at {!Event.StartTime__c} at {!Event.Location}. Questions? Call our primary number.
Click to enlarge
NOTE: Any text message that exceeds 160 characters will be broken into two text messages and each text message requires one credit. If you would like to exclude the timezone information from the message you can create a custom formula field on the Event Object.
Within SUMO Admin Settings you have the ability to create draft appointments. This would allow you to make changes to the appointment prior to it sending any emails or calendar invites. This is a global setting and would apply to all appointments that are created. You would need to create a flow or a trigger to update the information on the appointment.
To find this setting navigate to – SUMO Admin Settings – General settings.
Q: What things can I change?
A: You can change fields such as the description, virtual event details, subject and more.
Example: When an appointment is created it will take the Service as the subject, you could change the subject to add the name of the person who the appointment is being scheduled with.
Before Subject: Consultation
After Subject: Armstrong Consultation
Q: How do I get the appointment out of draft?
A: With the automation that you are using to change /update the appointment details, the last step in the automation would uncheck the IsDraft field on the relevant SUMO Additional Info record.
Q: If I am using Draft appointments will it still block the availability when the appointment is created?
A: Yes the time will be blocked so that no other appointment can take that time.
Description
The draft mode allows you to hold over propagating events to external calendars and hold over sending notifications until the isDraft field is equal to false on the Additional Info object. When this mode is enabled, all appointments are created in draft mode, i.e. the isDraft field is equal to true on the Additional Info object. This allows you to customize appointments before they are propagating to external calendars using custom client-side logic.
Activation
SUMO Admin Settings -> General Settings -> Create Draft Appointments -> Turn On
Setup -> Custom Setting -> Access Settings -> Disable Description Update -> Turn On (optional – should be enabled when changing the event description)
An example of custom logic
In this example, based on a custom trigger for the Additional info object, we will update the existing description of the appointment. After refactoring the current logic associated with the Draft mode, we will be able to update records without using an asynchronous call. In this example, a workaround is presented.
Salesforce allows you to define and manage email addresses that can be used as the “from address” when sending an email through Salesforce. Check out this Salesforce help article to learn more about org-wide emails.
Note: If your SUMO Version is 17 or higher follow the steps for changing this in a flow.
SUMO version prior to 17 changing the Workflow Rule
You have the ability to assign an org-wide email address to the workflow rule that controls the email notifications that are sent when using SUMO. Once you have created and verified an org-wide address, follow these steps to make this change for SUMO notifications.
Navigate to Setup – Workflow Rules
Click on workflow rule “Send Email”
Under Workflow Action click on the description “Send Generated Email”
Click to enlarge
Click Edit and scroll to the bottom
In the field “From Email Address” select the org-wide address that you would like to use.
Click to enlarge
Click Save
NOTE: This is an org-default for SUMO. Which means that this is the email address that SUMO will use as the From Address for all SUMO notifications.
Yes!! SUMO provides you with the functionality to choose your site colors and fonts for the externally facing pages.
You can change the Site and font colors as shown below. You may also choose between different font styles.
Click to enlarge
SUMO Scheduler supports the following font types:
Click to enlarge
WHERE CAN I SELECT WHICH COLORS AND FONTS I WANT TO USE?
Process based front and color branding settings can be found in the Admin Settings for the Online Scheduler and Invite Manager processes as shown below
Navigate to SUMO Admin Settings
Click to enlarge
Click on Online Scheduler or Invite Manager
Click to enlarge
Create a new scheduling process or click Edit next to an existing process.
On the Global Tab, scroll down to the section labeled Site Colors and Fonts as seen below.
Click to enlarge
HOW ARE THE COLORS AND FONTS DISPLAYED?
The colors and fonts defined at the process level are used by that specific process only. Meaning you can have different colors and fonts across multiple scheduling processes.
Online Scheduler
As shown in the image below, you are able to see where and how the different Site/Font colors are used for the Online Scheduler.
Click to enlarge
Invite Manager
As shown below, you can see where and how the different Site/Font colors are used on the external facing pages for Email and Invite, Invite Links and the cancel/reschedule pages.
Email and Invite & Invite Links
As shown below, you can see where and how the different Site/Font colors are used on the external facing pages when a participant clicks on an invite link (Email an Invite, Personal Scheduling Link or One Page Online Scheduler).
Click to enlarge
Cancel/Reschedule Page
The image below demonstrates see where and how the different Site/Font colors are used, when the participant clicks on the cancel/reschedule link from the email notification or ICS file.
Click to enlarge
The image below demonstrates where and how the different Site/Font colors are used, when the participant clicks on the cancel button.
Click to enlarge
The image below demonstrates where and how the different Site/Font colors are used , when the participant clicks on the reschedule button.
Yes!! SUMO provides you with the functionality to brand our external facing scheduling page with your company’s specific branding logo.
You can upload a logo and background image as long as you stay within the following size/format guidelines.
LOGO
1600w x 1200h
Less than 500 KB
Use the PNG format for compatibility with Internet Explorer
BACKGROUND IMAGE
1600w x 1200h
Less than 500 KB
Use the PNG format for compatibility with Internet Explorer
WHERE CAN I ADD MY LOGO AND BACKGROUND IMAGE?
Process based branding settings can be found in the Admin Settings for the Online Scheduler and Invite Manager processes as shown below
Navigate to SUMO Admin Settings
Click to enlarge
Click on Online Scheduler or Invite Manager
Click to enlarge
Create a new scheduling process or click Edit next to an existing process.
On the Global Tab, scroll down to the section labeled Branding as seen below.
Click to enlarge
WHERE IS THE LOGO AND BACKGROUND IMAGE DISPLAYED?
These images are used by that specific process only. Meaning you can have different logos and background images across multiple scheduling processes.
Online Scheduler
As shown in the image below, you are able to see where and how the Logo and Background image are displayed for the Online Scheduler.
Click to enlarge
Invite Manager
As shown below, you can see how the logo and background image is displayed on the external facing pages for Email and Invite, Invite Links and the cancel/rescheduler pages.
Email and Invite & Invite Links
As shown below, you can see how the logo and background image is displayed on the external facing pages when a participant clicks on an invite link (Email an Invite, Personal Scheduling Link or One Page Online Scheduler).
Click to enlarge
Cancel/Reschedule Page
The image below demonstrates where the logo and background image is seen, when the participant clicks on the cancel/reschedule link from the email notification or ICS file.
Click to enlarge
The image below demonstrates where the logo and background image is seen, when the participant clicks on the cancel button.
Click to enlarge
The image below demonstrates where the logo and background image is seen, when the participant clicks on the reschedule button.
A: Yes – On the SUMO Additional Info object there is a Source Field this field will tell you if an appointment or event was created in the following ways.
Email an Invite
Appt Link
Instant Booker
Online Scheduler
Multi Calendar Event
Multi Calendar Appointment
This will make it easy for you to pull into reports so that you can see the utilization of the SUMO features.
A: You have the ability to limit the amount of times an appointment can be rescheduled at the Service/Skill level or at a Global Level. You can also customize the error message that a customer would see when they have reached the limit and try to reschedule.
Navigate to: SUMO Admin Settings – General Settings
You can use change sets to send customizations from one Salesforce org to another. Change sets can contain only modifications that you make through the setup menu. For example you cannot use change sets to upload a list of services.
Please see this document for additional information about change sets.
Yes, on the “Additional Info” tab in the Admin Settings of the Online Scheduler, you can enable the ability for people to upload attachments on the Online Scheduler.
Count Limit: Up to 10 attachments
Size Limit: May not exceed a total of 1GB
File Types Supported:
All image file formats (for example, .jpg, jpeg, .png, .gif, .svg)
All audio file formats (for example, .mp3, .wav)
ZIP files (.zip)
Microsoft Office file formats (for example, .doc, .docx, .xls, .xlsx, .ppt, .pptx)
PDF (.pdf)
Unsupported File Types:
For security purposes, SUMO does not support certain file types, including, but not limited to:
If you would like SUMO to support a new image, audio, video, document or similar file type, please log a Feature Request.
You also have the ability to add attachments to appointments created through Invite Manager. You will find this at the bottom of the New Appointment and Email An Invite Pages.
Yes, you may choose the duration of intervals you wish to show when scheduling an appointment, and you may also force SUMO to always book at the top of the slot interval you choose.
Example
Here are a few examples:
If you set “Time Slot Intervals” to 15 minutes, then SUMO will display available slots in 15 min intervals, which maximizes the available options to the person scheduling.
9:00 am
9:15 am
9:30 am
etc.
If you set “Time Slot Intervals” to Appointment Duration then SUMO will display available slots in the duration that has already been defined for the appointment. If the appointment is pre-set to be a 30min appointment, then you will be able to choose options in 30min intervals, such as:
9:00 am
9:30 am
etc.
Top of the Interval
Enable “Top of the Interval” if you require all appointments to always start at the top of the interval regardless of Appointment Type (Service) duration.
If you enable “Top of the Interval” then the slot durations would be available at:
8:00 am
9:00 am
10:00 am
NOTE: Enabling this feature will not allow user to maximize availability. In other words, if you set the “Time Slot Interval” to 60min and enable “Top of the Interval”… and someone self-schedules a 30min appointment, they will only be provided the following time slots:
8:00 am
9:00 am
10:00 am
This will leave the following slots open on the SUMO users calendar:
8:30 am
9:30 am
10:30 am
Screenshot
Look for the “Appointment Settings” section at the following locations:
SUMO Admin Settings > Invite Manager > When Tab (scroll to bottom)
SUMO Admin Settings > Online Scheduler > When Tab (scroll to bottom)
By default, SUMO’s availability engine maximize’s user bookings and will not double book any given time slot.
Time Slot Feature
However, if you purchase the “Time Slot Capacity” feature, then you may configure SUMO to allow double booking (or more) on a per user basis, by increasing this “Time Slot Capacity” setting.
Benefits
This may be useful for organizations that get a lot of no-shows or if you plan to allow scheduling into “service queues” as opposed to with specific people. Service Queue configurations tend to be more popular in the health care and retail industries.
Examples
User Calendar: If you set this to 2, then SUMO will continue to show available time slots until each time slot has two appointments.
Queue Calendar: If you choose to make a calendar for a Service, such as “Dental Exams” and you have a 50% no-show rate, then you may choose to turn on double or triple bookings on the “Dental Exams” calendar.
Yes, the following SUMO tools support the ability to choose from either 12-hour or 24-hour format. This means you can create multiple schedulers, and support both 12-hour and 24-hour formats.
SUMO Scheduler allows you to pass parameters into the Instant Booker (aka “New Appointment” button) or “Email an Invite” button.
Parameters for Instant Booker and Email Invite
Which button are you trying to pass data into?
New Appointment: The parameter for this action is sumoapp__type=ScheduleNow
Email an Invite: The parameter for this action is sumoapp__type=EmailInvite
You may also pass in one or more of the following parameters. Please note that we require the 18 digit version of all ID that you pass in.
Appointment Type: This is used to pass in the ID for the SUMO Service record that you have defined.
sumoapp__whatId=[ServiceId]
Location Type:. This is used to auto-select the type of appointment. With SUMO you have three different location type options as shown below. Each with its own parameter definition as outlined below.
Video Conference = sumoapp__whereType=VID_CONFERENCE
Phone = sumoapp__whereType=PHONE
In Person = sumoapp__whereType=IN_PERSON
Location Record: This is used to pass in the ID for a specific SUMO Location record that will be auto-populated in the Location field when you click the button.
sumoapp__whereId=[LocationId]
Phone Detail: This is used to pass in a value to the phone details field on the SUMO appointment scheduler.
sumoapp__whereDetails=[Any PhoneNumber]
Host: This is used to pass in the ID for a specific SUMO Host (User), which will be auto-populated on the SUMO Scheduling page when you click the button.
sumoapp__whoId= (User Id )
Host: This is for the person hosting the meeting.
sumoapp__primaryParticipantId=[leadId or contactId]
Primary Participant: This is used to pass in the ID of that Primary Participant.
sumoapp__whoId=[Resource Pool Record Id]
Resource Pool: If you want to pass a resource pool.
Follow the instructions below to create a new button and construct the URL
Navigate to Setup – Object Manager
Go to the object where you would to create the new button
Auto-Populate Service & Location on “New Appointment” Button
Let’s assume that you want to replace the out-of-box SUMO “New Appointment” button on the Lead page, with a custom “New Appointment” button that passes in the following parameters automatically, so your SUMO Users do not have to manually populate these fields.
Dynamic Service
In this example, you will create a custom formula field on the Lead Object that does some basic IF/THEN logic on another field to determine which SUMO Service (Appointment) to automatically select. For example, if an existing Lead Field called “Prospect Interest” had a picklist selection of = “Service A Demo”, then your formula should produce
sumoapp__whatId=[ServiceId]
Dynamic Location
If the prospect stated they want a Video Conference, then auto-populate the sumoapp__whereType=VID_CONFERENCE
If the prospect stated they want a Phone Call, then auto-populate the sumoapp__whereType=PHONE
You will add the following parameter and append the data that you want to pass.
/lightning/cmp/sumoapp__inviteManagerCmp?sumoapp__relatedRecordId=[Lead, Contact, or Person Account ID]&sumoapp__type=ScheduleNow&sumoapp__whatId=[ServiceId]&sumoapp__whereType=VID_CONFERENCE
Passing a Host or Resource Pool
A Who ID can be used if you wish to pass an appointment host or a resource pool.
You will add the following “sumoapp__whoId=”
=” and append the Who Id you want to pass.
The link should look similar to this:
/lightning/cmp/sumoapp__inviteManagerCmp?sumoapp__relatedRecordId=00Q3h00000AV3pqEAD&sumoapp__type=ScheduleNow&sumoapp__whoId=[Your Who ID]
/lightning/cmp/sumoapp__inviteManagerCmp?sumoapp__relatedRecordId=00Q3h00000AV3pqEAD&sumoapp__type=ScheduleNow&sumoapp__whoId=[Resource Pool Record Id]
Will SUMO optimize the route for the dispatched user?
No, the SUMO Field Service Scheduler essentially takes the address entered in by the customer, determines which SUMO Users are within proximity, gives available dates & times to choose from, and immediately books the SUMO user to travel to this customer for this appointment. This feature does not take into account any appointment before or after the available slot. Read below about how “Buffer Times” can be used to assist here, however.
Route optimization requires a much more sophisticated solution like Salesforce Field Service Management. However, be aware these robust dispatching solutions require a large volume of field service requests, dispatch out an entire day of appointments at once in order to route them properly, and are many times more expensive. If your needs are more simple, SUMO Field Service Scheduler can definitely help.
Does SUMO have Buffer Times to auto-add “Travel Time” before and/or after an appointment?
Yes. Each SUMO Appointment Type (Service) can have pre-buffer and post-buffer time configured. For example, if your users service a 30 mile radius, you can set a 45min pre buffer time and 45 min post buffer time, which will block your users calendar before and after the customer appointment, giving them sufficient time to travel to the customer. Further you can increase the appointment time to a larger window of time like 10am-12pm, and inform the customer that your employee will arrive inside this window of time, to account for unknowns, such as traffic delays.
Can SUMO first choose the user closest to the customer, then choose a user based on priority?
Yes, this “Use Distance Rule before Priority” feature is available at SUMO Admin Settings > Online Scheduler > Who Tab.
If you choose “Priority-Based” assignment, SUMO will assign the appointment to SUMO Users, based on Priority. For example, any SUMO Users with Priority = 1 will be considered before those with Priority = 2, etc.
Secondly, if enabled, the “Use Distance Rule before Priority” feature will first determine which SUMO User is closest to the customer’s location, then will run the priority logic to assign the highest priority SUMO user to host the appointment.
For example, consider the following settings:
Zone 1 = radius 20 miles (so any user that is within 0 to 20 miles of the address the customer enter’s into the Online Scheduler, will be considered)
Zone 2 = radius 50 miles (so any user that is within 20 to 50 miles of the address the customer enter’s into the Online Scheduler, will be considered)
User 1 is set to priority 1
User 12 is set to priority 1
User 2 is set to priority 2
User 22 is set to priority 2
Now consider the following example:
The customer uses the Field Service Online Scheduler and enters in their address.
Based on the address entered, User 2 is working in Zone 1, and Users 1, 12 and 22 are working in Zone 2
If “Distance Rule First Rule” is enabled:
SUMO will consider all users in Zone 1 and select any user with highest priority, in which case, SUMO will show availability for User 2.
If “Distance Rule First Rule” is disabled:
SUMO will consider all users with the highest priority, which is User 1 and User 12, and then SUMO will check which of them is in the closest Zone. SUMO there are no Priority 1 users in Zone 1, SUMO will consider users in Zone 2, which means SUMO will consider both User 1 and User 12.
For any user using the Google, Outlook or Exchange connection types, customers may receive calendar invitations from Google, Outlook or Exchange exposing the Hosts name.
SUMO has a NO-Reply calendar feature for Google and Outlook customers, where they can define a calendar that all calendar invitations will come from. Keep in mind the following when using this feature:
All appointments will land on this calendar.
The calendar invitation will be sent from the email address associated with this calendar.
All appointments will still go against the appropriate HOST availability and land on their connected Google or Outlook calendar.
For Salesforce Calendar Users
However, if your users are using the Salesforce Calendar Connector (not Google Calendar, Microsoft Office365, or Exchange) then:
You can hide the real name of any SUMO Users (Organizers or Participants) on the Online Scheduling Widget, Single Page Online Scheduler, and the SUMO Appointment Description. For example, perhaps you would rather your customers schedule with “Support Agent” instead of revealing your support agent’s real name.
STEP 1: Enable “Alternate Name” in Admin Settings
Go to SUMO Admin Settings
Click Calendar Connector in the left nav menu.
Click the Settings tab.
Click to enlarge.
STEP 2: Give Each User an Alternate Name
Then the “Alternate Name” field found on each Salesforce User’s record, must be populated with “Support Agent”. If you leave this field blank, SUMO will display their name with the word “Hidden”.
STEP 3: Update Email Templates
You will also need to update email templates with the appropriate merge field for Alternate Host Name on the “SUMO Addition Info” object (formerly “SUMO Event” object).
In the Online Scheduler or Invite Manager process you may enable the ability for customers to cancel and reschedule appointments.
Navigate to SUMO Admin Settings
Click Online Scheduler or Invite Manager
Click Edit on the Process you wish to change
Navigate to the Booked Tab
There you will have the ability to turn this feature on or off. The customer will see these buttons on the confirmation page and will also receive a link to cancel or reschedule in the email they receive.
How can I tell if a customer has canceled or rescheduled?
There is a status field on the SUMO event that will change from Booked to Cancelled or Rescheduled.
Is there a way to capture why the customer is cancelling their appointment?
When the customer cancels the appointment they are prompted to enter a cancelation reason. After they have cancelled this information is available in the SUMO event.
Within SUMO CEP, developers can override page styling with CSS. This will give you the ability to style your customer facing pages differently if you choose to.
You can apply unique styling to each Online Scheduler or Single Page Online Scheduler (via Invite Manager Template).
How do I apply CSS styling to an Online Scheduler?
Go to SUMO Admin Settings | Online Scheduler | Click Edit next to the Online Scheduler you wish to update. Then scroll to the Branding Section, there will be a field labeled CSS. Here you can enter your own custom styling for the Online Scheduler using the page references below.
online-scheduler-portal-client-info (Contact / Lead Form) – .client-info-page
How do I apply CSS styling to an Invite Manager Template?
Go to SUMO Admin Settings | Invite Manager | Click Edit next to the Invite Manager Template you wish to update. Then scroll to the Branding Section, there will be a field labeled CSS. Here you can enter your own custom styling for the Invite Manager using the page references below.
How do I apply CSS styling to an Event Scheduler Template?
Go to SUMO Admin Settings | Event Scheduler Templates | Click Edit next to the Event Scheduler Template you wish to update. Then scroll to the Branding Section, there will be a field labeled CSS. Here you can enter your own custom styling for the Event Scheduler Template using the page references below.
SUMO Scheduler has two Online Appointment Schedulers, which you can pass ID parameters into:
#1 = “Online Scheduler”
The Online Appointment Scheduler, is a multi-step process which may be deployed in a popup, iframe, or as a microsite.
Click to enlarge.
#2 = “Single Page Online Scheduler”
This is the single page online scheduler, which is generated from the Appointment Links feature.
Click to enlarge.
How to Pass IDs into the “Online Scheduler”
The following ID’s can be passed into the URL of the Online Scheduler:
Template ID = processId
Location Type = locationType
IN_PERSON
VID_CONFERENCE
PHONE
Location ID = whereId
Lead, Contact, or Person Account ID = clientId
User ID = whoId
When passing a Who Id for a Resource Pool, the Assignment Mode selected on the Resource Pool will be used instead of the Online Scheduler’s Assignment Mode. Rescheduling Appointments created with this method will use the Resource Pool Id to choose a New Host.
Service ID = whatId
IMPORTANT:
Online Scheduler: To pass an ID, you’ll need to start with the URL of the Online Scheduler, which can be found by going to SUMO Admin Settings > Online Scheduler, click Edit next to the proper Online Scheduler, and copy either of the URLs found on the Global Tab under “Scheduler Links (URLS)”.
Examples
Passing a Template
To pass a Template ID, you’ll take the URL you copied. Put it into a text editor (Notepad, Notepad++, etc.) and paste your base URL there.
To relate an object to the Appointment, you’ll take the URL you copied. Put it into a text editor (Notepad, Notepad++, etc.) and paste your base URL there.
You can use this to relate the Appointment to a Standard (Account, Opportunity, Case, etc) or Custom Object Record.
To ensure that the record is properly related, the Site Guest User for the Online Scheduler will need to be able to see this record (Read Access & Sharing Rules.)
HOW TO USE PARAMETERS TO PRE-POPULATE FIELD VALUES FOR THE ONLINE SCHEDULER
You can pre-populate fields on the Online Scheduler for any fields added from the Lead, Contact, or Person Account Objects, by passing the parameters into the Online Scheduler (URL).
The following field types are supported:
Lookup
Checkbox – (This does not apply to the Checkbox related to sending the Text Reminder on the Single Page Online Scheduler.)
Date
Date/Time
Email
Number
Percent
Phone – (This does not apply to the Mobile Phone Number field on the Single Page Online Scheduler.)
Picklist
Text
Time
URL
Example
STEP 1: Start with the URL
Create or go to an existing Online Scheduler process and copy or launch the URL.
Click to enlarge
STEP 2: Construct your Parameters
Navigate to SUMO Admin Settings > Lead Tab (or Contact Tab)
Click to enlarge
Parameters should be in the format A{field-order-number} or a{field-order-number}
Click to enlarge
For example, in the screenshot above, you can see that the Contact “First Name” field is Order 2, whereas, “Last Name” field is 3. Therefore, the parameter you would pass in, would be: &A2=John or &a3=Doe
Note: In other words, the field-order-number is the field order position on the Admin Page.
Click to enlarge
Since the Admin can only add up to 10 fields on the “Online Scheduler”, then you may not pass more than 10 parameters in the URL.
SUMO includes a data import tool, which can be used to import data into SUMO. You can import standard objects, such as Leads, Accounts, Contacts, as well as custom objects, like Appointments, Appointment Participants, and more. You may also add new records or update existing records.
*Import Wizard Screenshot
Use Salesforce Data Loader
Importing records into SUMO requires knowledge of the Salesforce Data Loader tool (or similar tool). In general the following fields must be included in your import:
If you plan to use the WHERE PAGE in the Online Scheduler, you will need your own Google Maps API. Since the time of writing this article, Google offers 14,000 – 28,000 map loads per month at no cost and additional loads for a nominal fee. You may learn more here:
If Creation Date of User is greater than Creation Date of All the available Sandboxes then we need to request Customer to refresh the existing sandbox or create a new Sandbox Environment and provide login access to Sumo Support.
If Creation Date of User is less than Creation Date of any of the available Sandboxes then follow these steps:
Login URL for sandbox is : https://test.salesforce.com
For example, if a username for a production org is user1@acme.com, and the sandbox is named “test,” the modified username to log in to the sandbox is user1@acme.com.test.
Password will generally be the same as Production user password.
After Logging in, you should follow these steps:
At the top of any Salesforce page, click the down arrow next to your name. From the menu under your name, select Setup or My Settings—whichever one appears.
From the left panel, select one of the following:
If you clicked Setup, select My Personal Information | Grant Login Access.
If you clicked My Settings, select Personal | Grant Account Login Access.
Set the access expiration date by choosing a value from the picklist.
You’re granting login access for SUMO Scheduler Support
Yes, SUMO offers several one-time implementation / setup packages for those interested in our help with the process. This SUMO Support Center includes tons of information to teach you how to both administrate and use the software. To get up and running quickly, we offer four implementation package options:
Quick-Start Implementation Package (*We train you as a SUMO Admin to self-implement.)
Commercial Implementation Package (Best for 60 users)
Enterprise Implementation Package (Best for 60-120 users)
Custom Implementation Package (Best for 60+ users with custom requirements)
All customers may email support@sumoscheduler.com anytime for free ongoing support.
Your SUMO Platform will include 11GB of file storage. For each user, you will receive 2GB of file storage.
You may purchase an additional 1GB of file storage.
*11GB will store over 1,000,000 web images or 10,000 avg. PDF files. So, you have a long ways to go before you ever have to worry and you can always delete old files to avoid purchasing more storage. In addition, the AppExchange marketplace offers competitive storage options, should you wish to explore these.
Data Storage
Your SUMO Platform will include 1 GB of data storage. For each user, you will receive an additional 20 MB of data storage.
You may purchase an additional 500 MB of data storage per SUMO platform.
Yes, SUMO CEP supports the Salesforce NPSP. SUMO helps organizations schedule with Salesforce Users, Leads, Contacts, and Person Accounts from any standard or custom object. SUMO has customers using SUMO with NPSP and in our experience, so long as you are using Salesforce Users, Leads, Contacts, and Person Accounts, you should be fine.
Yes, all SUMO CEP functionality is available in Salesforce Classic, but does require Lightning Experience to be enabled, since SUMO utilizes multiple lightning web components to display pages.
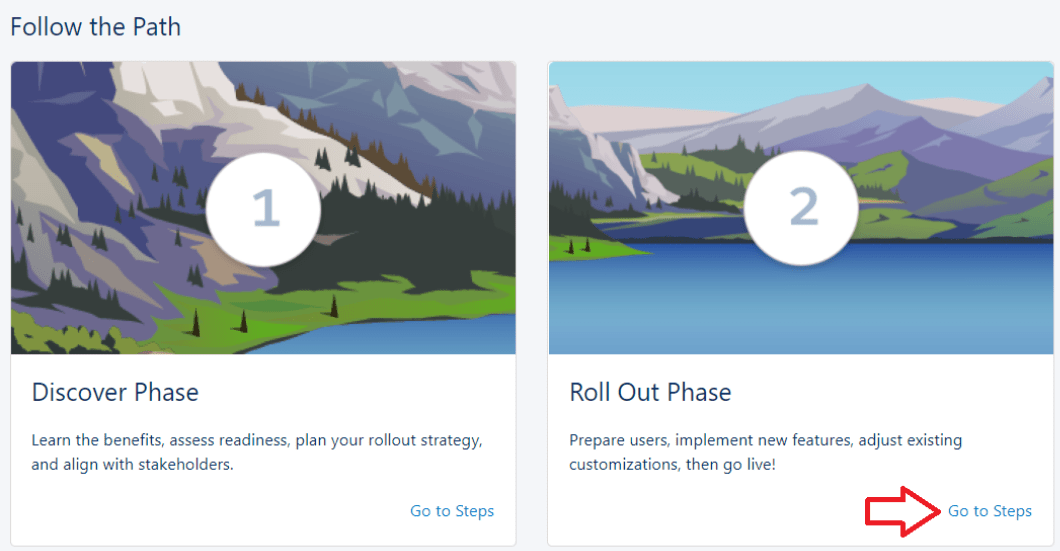
To enable Lightning click Setup | Get Started under Lightning Experience Transition Assistant | Click the Go to Steps on Roll Out Phase and Enable.
Once you check the box to enable, it will ask you to confirm enabling it as it is a feature that will be permanently enabled.
STEP 1: Setup Menu
Click to enlarge.
STEP 2: Lightning Experience Transition Assistant / Roll Out Phase
SUMO does not rely on SYNC technology. SUMO has a Calendar Connector that connects SUMO directly to your calendar (Google Calendar, Office365, etc) and acts as an availability engine. The SUMO Calendar Connector, will check your free/busy information in real-time and will put appointments on your calendar.
With that said, the following tools are available on the Salesforce platform to accommodate full calendar sync (mirroring) between the Salesforce Calendar with any 3rd party calendars, such as Google Calendar.
Salesforce Lightning Sync for Google Calendar
Salesforce Lightning Sync for Outlook / Office 365
Salesforce for Outlook (older solution, being phased out)
In addition to the above, you may also find the following 3rd party tools available on the AppExchange:
Yes, SUMO CEP has the capability to support multilingual for both the online prospect/customer experience, as well as the CRM employee experience in Salesforce.
Yes, SUMO has different stages in the self-scheduling process where you can turn on/off the Captcha solution.
What is Captcha?
Captcha is technology that requires users to confirm they are real and not a bot. This is important to deploy, to prevent bots from spamming you. While it is extremely rare, if you were targeted, it could cause you to receive hundreds or thousands of fake appointments. Therefore, SUMO includes the most powerful Captcha technology by Google.
Over the past few years, web conference tools (ex: Webex, Gotomeeting, Zoom) have realized users are tired of creating a “video conference link” for every single meeting. In 2018, they all started releasing re-usable “Static Video Conference Links” (aka Personal Meeting Link). Users simply give their personal meeting link to people to meet with, so they do not have to create a new link for every single meeting.
What are the benefits of this approach?
Static Video Conference Links with Lobby or Waiting Rooms is a fairly new standard.
This approach allows you to leverage any web conference tool you wish that offers your own Personal Meeting Room Link, which all of the leaders offer now.
This also gives our customers the freedom to change video conference vendors, and not feel “locked in”, just because a specific tool integrates with SUMO.
How do I prevent meeting collision?
To prevent meetings from colliding, all leaders in Web Conference space now include “Static Meeting Links with Waiting Rooms”, which allows the host to set a password on their meeting link and “ACCEPT” people as they attempt to join, so if a meeting runs late, and the next group tries to join, you can keep them in a “waiting room”, while you conclude your current meeting. Here are more details from the leader providers: